Thursday, February 5, 2015

The Speedlight Snoot Test

Today, I ran a test with some of the snoots available for speedlights. I was amazed at how defective many of the concepts are; there is a clear winner in the end.
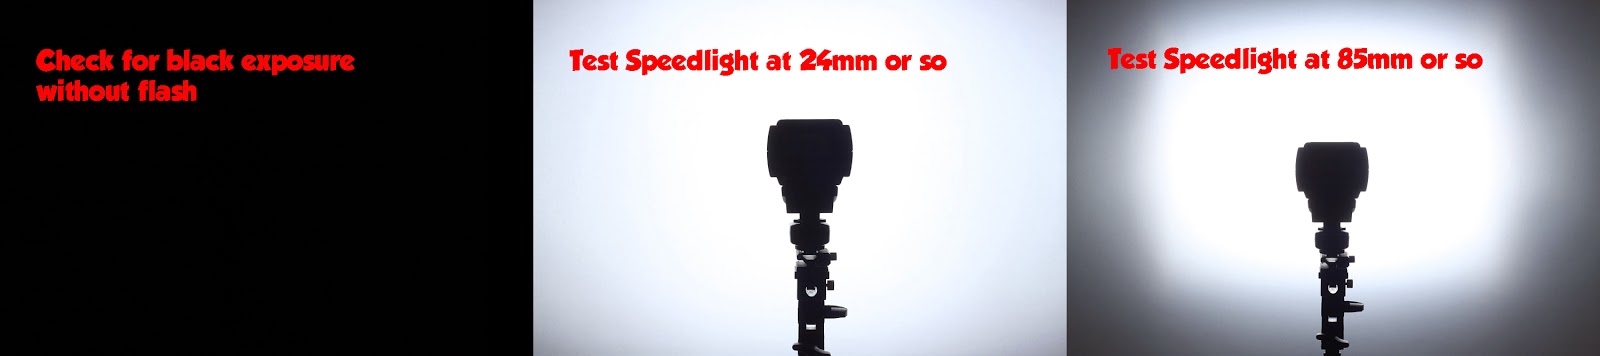
I placed my speedlight about 50cm away from a white paper. First, I tested for a black shot, eliminating existing light. Then, just for curiositsy, did a bare bulb shot at 24mm zoom and one at 85mm, chosen deliberately.


Okay, there´s no more ambient light at f/11, 1/250. I can see the vignette of the 24mm blast at this distance. I´m good to go.
Please note the shape of the speedlight´s projection. Designed to throw light forward and serve the frame of the camera it was made to be put on, a speedlight does not produce a gentle round spot, but a rectangular-ish pattern.

First, I put on the snoot from the Calumet Speedlight Modifier Set, which is sold under many different brand names in many countries. I didn´t expect too much...


This thing is difficult to mount and has two slip-on grids which will always fall off.
Look at the pattern. Yes, it cuts down the light, but retains the distorted shape of the speedlight´s original output.
Please note that this will most likely happen with any even more expensive snoot solution! Say, you´re spending a few hundred bucks on a Bowens snoot and speedlight adapter - it will probably look the same. This is mostly because the snoot is black on the inside. A white interior would diffuse the light in the inside before snooting it. The flash is at 85mm here.

While at it, let´s go for the mini dish which is included in this set and see if it´s any good:


Uh... The bare dish has heavy spill (I´m still at 85mm to MINIMISE spill!). So I put on the white plastic "fresnel" style disc (shot 2). I actually used this as a gradient background light in my portraiture a few times. But when you put on the grid, VERY ugly things start to happen (shot 3).
Experience tells me that this dish tends to lose the deflector very quickly when moved around.

At this time I must conclude that the only REALLY useful things in that Calumet set are the diffusion dome and, well, the mini dish if you put the white disc on.
I never tested the coloured discs or the golden deflector. They look too pathetic to me. Also, please excuse I only tested one of the three grids, but I guess the other two won´t do any better. 

I love the Expoimaging Rogue modifier range. Let´s check out the Flashbender if it can snoot better:


Well.... no. I mean, yes! It does a better job than the plastic crap in the last run, but its shape is so hard to control that you cannot produce a round reflection. It´s great as a general snoot for hair or kicker lights or accents from either side of the set. But straight-on snooted flash is not very good. Its secret, however, is the white inside! This helps a speedlight produce a spot with much better falloff. But as you can see, the flashbender does much better when used as a reflector or flag. Actually, it´s my go-to thing to have on a tethered TTL flash in my left hand when shooting events.

Next up: The Rogue 3-in-1 grid:


Easy to see, this is the winner. Its spot is a perfectly round circle, even with the flash at its widest setting. Again, the secret is the white inner coating.
It´s a cinch to put on, it´s sturdy and well-crafted, it´s pretty much failsafe and very innovative. Well worth the money! It packs in a very small bag and will always fit in your bag. You can also order colored gels with it (they are specially cut-out to fit; the yellow one came with it). Bonus feature: the sleeve without the grid holder makes a nice spill kill if you use an umbrella.


As you can see, there is minimal projection of the honeycombs at the rim which will go away at real-life working distances.

I highly recommend you get two of these if you want to have control over light spill or actually use them as a spotlight in every aspect of photography. I love to have them on my kicker lights as they keep my lens clean from flare. Maybe I will use them as a round spot in a future still ilfe shot, now that I know for sure they can do it.


Thursday, January 29, 2015

Quadrupling Your Speedlight Power The Cheap Way

Today, let´s have a look at multiplying flash power from your speedlights. Maybe you have googled "subduing the sun" before? It´s a way to take the most interesting photos outside, even at noon on a sunny day, producing the most dark blue skies in the background while lighting your subject well. Also, it´s a way of prolonging battery life of each flash during a long shoot as well as cutting recycling times.

 Of course, this involves buying several speedlights, a bracket to hold them and some way of triggering them all at the same time. Many ways to do this!

I´ll go the cheap cost-efficient way: instead of employing multiple receivers for my wireless / buying expensive brand TTL-Speedlights / even buying (relatively expensive) optical slave units, I took another walk to my local photo store and searched through their odds-and-ends-box. I came up with many different PC-cables (the ones that connect studio flashes to your camera) and hotshoe-adapters.
My radio trigger system doesn´t have a PC socket, neither do my Metz flashguns (duh!), so I´ll have to adapt to this fact as well.

--GENERAL THOUGHT--

As I said before, the best way of ganging Speedlights is putting them together in EVEN numbers. Two speedlights will give you ONE MORE STOP of light output. Four of them will add TWO STOPS. Three speedlights (like the Lastolite Triflash and many other multibracket will hold) give you ONE AND A HALF STOPS of light. Photographically, that doesn´t make very much sense. If you´re only out to cut your recycling times, of course, this´ll help quite a bit. If you only need that extra half stop - fine.

So, do I have a flash bracket that holds four guns? Yep.


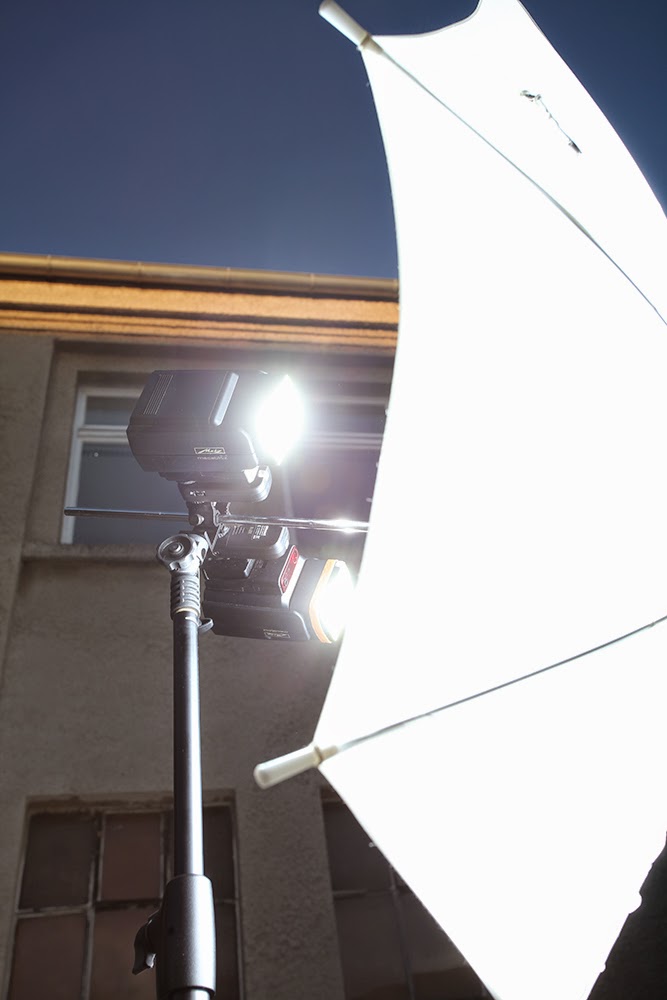
There´s a lot of power in this setup! You can already tell from the silhouette that there is a confusing bit of wiring going on. Let´s have a look at the configuration:


The remote is to the right (deliberately). It feeds a shoe adapter which is not wired inside, but features one PC socket for each level. You can wire it yourself simply by connecting the two sockets, but I need to break out here.
The coiled cable feeds a 3-split under flash "1". This feeds the hotshoe it is connected to which then triggers flash "1". This is it, basically. The two other splits go to one wired shoe each, firing flashes 2, 3 and 4.

Of course, the weirdness of it all originates from the special selection of accessories that I found in that ol´ box. Hey, it´s a flea market after all!

Let´s see some of it in detail: Here´s the radio remote with the split shoe, feeding the 3-split on the other side (out) and the trigger cable for its own flash (in)


And here´s the split-thing. I painted in a schematic of the shoe´s internal wiring. This one is "cold" on the bottom which is important, because some old flash brackets are made of metal. It triggers its own flash while at the same time linking the signal to another (of course, it´s not a real signal. X-Sync triggering is only a short-circuit of the speedlight´s contacts) .


´course, if you have three of these shoes, you can set it all up more elegantly. But again, this is a flea market solution. I like it like that ;-)


--SOME ISSUES HERE--

Is this the ideal rapid-fire setup for a Californian high-noon photoshoot? Well... it´s got some power for sure. But there are some points worth noting:
- With all these adapters mounted on top of each other, things start to get a bit wobbly. I´d NEVER move this setup when high on a tripod. I will ALWAYS lower the tripod and hold at least one speedlight in my hand. None of the mounts is fail safe. Also, when moving it, always tip the bracket FORWARD, where there is a hard stop in each of the shoe mounts. Also, check for good grip after each transport.

- PC sockets and cables, being the industry standard today, were invented in the 1900s or 1910s or so. Back then, NOBODY would EVER move connected equipment ANYWHERE! There was a large format camera, meticulously set up on a tripod, there was electrical power in that place and a huge flash system connected to the shutter with this tiny plug. Everything rested until the shot was done, everything was disconnected and the next shot was set up. Of course, you´d first disconnect the PC cable from the camera, so nobody could trip over it, killing the cable and damaging the camera. So, you guess... neither male nor female connector are very stable. Many times, your connectors will simply slip out, leaving you wondering where your flash power went until you go checking on the wires. Of course, stacking them as I did does not improve reliability. It´s probably not even very wind safe. Please keep this in mind. If you have built your perfect high-power speedlight rack, you may want to fix everything permanently, using glue, tape and zip ties on everything.

- Watch out! There are cables that feature male-male connectors, others have male-female! Please take some time to plan out your wiring and connect everything right in the store for a test.

- It is also a nice idea to check your wires and shoes with a multimeter. You don´t want to find a broken cable when you´re on the set. Hotshoes with attached cables always break first.

Taking all the necessary precautions, I think that this is a nice cost-efficient solution. Finally, I can use this clever bracket without having to burn all my radios and slave triggers on one single light. Oh, and all these ancient cables won´t have to feel so lonely in that box at the store anymore!

Monday, January 19, 2015

The Cutting Edge for Macro and Tabletop Photography

Everybody seems to spread light these days. So let´s cut some instead!


You can tell from the shadows that there was some sort of gobo involved here. The main light is to the right (it´s a LED torch). It passes through a slit between two black flags, each standing up being held by a super clamp on the floor. I also added a shaving mirror from the left, reflecting my only light source.


The main reason why the shadows are so well-defined is that the light source is relatively far away and the cutting flags are relatively close.  It´s like your own shadow on a sunny day: hard and clearly defined. It is almost a projection of your outline.

What else we can do? Let´s move to the window-lit kitchen and again apply the LED torch.


Here, I used the cutters to highlight a certain word in the classifieds of a local newspaper. The bright white room offers a lot of fill here. Back in the dark (my aisle), you´d have much more contrast. I´d shoot it like this if I were assigned for a newspaper job and I´d probably shoot the high-contrast version if I wanted to do art. All to taste.

Here´s the setup. Note the ULTRA-PROFESSIONAL AVENGER BLACK FLAGS and SUPER CLAMPS! HA HA! Whoa, there´s even a sheet of TRACING PAPER thrown over the torch!


No, seriously: this here will do the exact same job and costs nothing:


Also, look at how deliberately the flags are placed in the first example. All I need is the desired gradient in the shadows. Let´s turn them around and try to highlight another word. You see that I can get as small and precise as I want with my slit


Here´s the setup for this. The edges of the flags are closer to the subject, thus projecting a punchier shadow. Again, fill is provided by window light spreading across the room (finally, it pays off that one wall in my kitchen is painted neutral grey!)


Like to get harder? Let´s remove the tracing paper and readjust the flags a little:


Let´s go back to the dark. Now, with the hard light source and a pair of flags you can go wild beyond taste! (Illustrative purposes only; also, mirror added from the left).


Of course, you can  also use the flags to cut off any unwanted light spill (I´m sorry I forgot to photograph the spill, but believe me: there IS some and it HAS been cut)


If you want to copy this look, please note that the background for all dark shots is a board of styrofoam painted black. The subject is raised on a small pole so that I can keep the light from hitting the background and have everything nice and dark. In fact, in the first picture (the one with the lens) you can see a bit of spill on the background if your monitor is setup accordingly. No problem with Photoshop. Would disappear in print. Actually, I like it as it adds a hint of dynamic feeling. But you see, there´s a reason to use continuous lighting or studio strobes when shooting tabletop photography. You have to adjusts the lights millimeter-wise, cut and reflect, cut again, diffuse and cut again, spend the day waving white cards and then, you check and check and check again. Not exactly a job for speedlights.

Here´s an edit of the first picture so you can see the effect of the spill:


That´s it for today. Thank you for your kind attention.


Saturday, January 10, 2015

Quenox Parabolic Umbrella vs. Big Octadome

I made myself a nice christmas present: a Quenox Parabolic Silver Umbrella - mine is 180cm and came used and super cheap via the bay. It it not exactly a parabolic umbrella like the Para 88 and thus not an ultra-versatile adaptable light shaping tool, that you can use outside, because ...well... you just can´t use the Quenox outside. Or anywhere near a window, for that matter. It is a huge umbrella.

But due to its shape and depending on the placement of the flash head you can produce a VERY effective beam of VERY nice light.

I had taken it to someone else´s studio where I found a large Octadome. Now, that´s a first test: compare the big brollie against the stripped dome. And guess what?


a Saturn V rocket as seen during take-off from below.
Although the Quenox seems to be the much, much harder reflector it is the one that casts NO shadow at this distance! Maybe I found a sweet spot? Maybe I was just the right distance from the background? Let´s turn around and have a look at the paper


Here´s my arm. The Octa is now behind me to my right and the Umbrella to the left (they are so huge that I CAN stand between them, although they touch. Their respective middle axes are 1,5m apart.
You can clearly see that the Octa throws a shadow of me, my arm, my camera and the on-camera flash which I used to trigger the studio strobes.

Surprisingly, the stripped Octa is quite harsh, given its size (please don´t judge skin tones, shadow rendering or anything. The two silver monsters cancel each other out on my arm). Without diffusers on, it should act like a giant wide angle bowl. Obviously, it´s the bare bulb blasting through the middle that makes it so hard. Hm, might try that naked Octa as ...let´s call it... ULTRADISH!

Check out the first picture again. Both heads are at the same power setting. But the umbrella is so effective that it seems just as bright as the bare bulb in the Octa. Giant silver disc? Nice! Very nice! Good thing to have that off your wish list ;-) Guess I´ll blast the models on the next test shoot with that beast...

BY THE WAY, holding out your fist in front of you is the professional way of checking the quality of the light. Your thumb represents the subject´s nose. This gives you a rough first impression of how and where to place your subjects in front of your camera regarding highlights and shadows.

Thursday, January 8, 2015

AA Battery Holder Comparison

I act a bit erratic in my gear acquisition process. Usually, I buy what comes my way and is within my budget - as soon as I can make use of it, of course! This especially goes for small and useful equipment, such as cables, adapters, spigots and battery holders. Oh, there we are! I have three different models, so let´s have a look at them. They only cost a few bucks each, but you should know what you´re going for. Also, they might seem simple, but how DO you handle them?
Running and gunning strobist-style, you always need fresh AA Batteries to feed my flashguns. Keeping and carrying them is easy, but I like to know at first glance, whether I have a pack of fresh or empty batteries in front of me. I also like to keep each set of four together for their whole worklife.

Baybox BATTERY-BOX AA, AAA, CR123A, Flash Cards


This is a smart little thing. Actually, it´s the smartest and ...um... largest thing in the whole review.
As the apt name says, this nice box holds AAs, AAAs, CR123s and has slots for CF cards, which can be stored alternatively (four CFs per unit)
As you can see, they can be stacked. Unfortunately, I only own two of these and they seem no longer available but have been replaced by the Akkubox Foto Plus, which is twice the length and capacity. 
The hanger for store display slides out the back. If you slide it in again, it pushes against box and lid, thus locking it tight. Good thing I threw mine away, mindlessly.

How do you identify the full batteries? Easy, it´s even printed on the back. Plus up means charged, minus (bottom) up means empty. You can see the orientation easily through the acid-resistant plastic.


Here is the company´s website. They don´t ship at the moment (Jan 2015), though. Actually, I got mine for free with the purchase of a few batteries in a battery store and I´m glad to have them! 


GENERIC EBAY  BATTERY BAG


These things pop up irregularly on ebay. They´re ugly but quite okay, given the price. The lid is velcro´d and there is a plastic window on the front. Again, battery orientation is the code for the status of the batteries. But you have to know how your batts look from the side, when they´re charged. Works for me, too. I have like eight or ten of them flying around here, somewhere. Here´s one with charged batteries:


They feature a belt clip with a snap-fastener, which is very nice indeed! You can clip them to your camera strap, your accessory bag strap, whatever and they will only come off by force. Also, if you don´t need them, they fold flat and weigh nothing. They exist in an AAA version, too. You can fill memory cards in there, too, of course. But it´s not dustproof.

This battery holder is about the only one of the three which can be operated with gloves on.

 I´m sorry I cannot give you a manufacturer here. You have to check ebay from time to time for these

ENERGY INSIDE BATTERY BOX


Now, here´s another rather generic item. Here is a link to the only shop where I found these (again, it´s man, where´d I get these couple years ago??). But I´m sure there is a local manufacturer in your country who produces the exact same thing. Let me just utter a few thoughts about these: 

They hold 4 AAs or 4 AAAs (which then would sit between the ribs you can see in the lid. This is nice, because you wouldn´t want to have rechargeables clattering around in an unnecessary manner. They´d get damaged).

These things are compact and very useful. They are a bit hard to open, but that also means that they won´t ever open by accident, leaving you with a pile of fourty-eight batteries inside your bag. The small latch lies almost flush with the box when locked.

Now, here comes the big trick. I was pretty sure that I could do the orientation trick here, but I got confused EVERY time. I guess, initially I defined plus toward the latch as charged like in the picture above. It took fabulous Zack Arias to show me the light. If you want to be 100% sure, just store EMPTY batteries like pictured above. Or the other way round, it does not matter. BECAUSE YOU STORE FULL BATTERIES LIKE YOU´D PUT THEM IN YOUR FLASH! LIKE THIS:

Duh! Facepalm! All too easy, isn´t it? This is one of the magically brilliant tricks in Zack´s fantastic book Photography Q&A which I recommend to anybody. Photographer or not.
This is so smart, I even shot another picture of it:


You see, you actually can put some thoughts into something seemingly silly like a battery holder purchase. It´s the little things that count. You have to handle these each and every day you´re out with your flash and although each item listed here is a good, working and inexpensive product, you may one day walk out and find the one that´s perfect for you. [insert unicorn and flowers here, play soft flute music]

Monday, December 22, 2014

Strobist approach to a model test shoot

I regularly shoot "Open Studio" for Brigitte Models in Munich. That´s when a few girls come in to apply for a model career. They feature plus-size models (aka "normal girls"), so if you´re above 170cm tall... maybe we´ll meet in their office one day, who knows?

This is my working space. Phottix Easy-thing-box-thing 70x70 as a kicker, left main light is a silver umbrella with a B.I.G. Blitzschiene & two strobes, on the right you can see a white umbrella with the Triflash & two strobes.


Kathi posing on a chair


These shoots are quite a strobe orgy. Four to six girls show up, scheduled to dress, make-up, shoot, re-dress, change style, and shoot again. This time, we had six girls. First test shot was made at 10a.m., last frame was shot at 5:55p.m. So I worked 8 hours with my strobes turned on, minus a 1hr lunch break. I don´t own a fancy Profoto or Elinchrom set with superfast T.1 times and the agency, for a good reason, doesn´t pay luxurious rates for these test shots, so I bring my speedlights to the session. I need them to freeze action such as jumping and hair-flipping, but still I need to be on a budget and not rent anything.

Jumping and hair-flipping... freeze that motion and either get a super-expensive brand flash or.... a couple of hotshoe strobes. Period. Try and use the cheap brands. Someone flips their hair? Smear. Someone jumps? Blur. Someone even WAVES THEIR HANDS? Smudge. I tried German generic brand Walimex, I tried USA brand Calumet. It doesn´t work because their T.1 times are around 1/200sec instead of 1/1500sec like with the REAL pro brands.


In order to give the newbie girls freedom to move, spin and turn at free will, I usually apply two white umbrellas from either side plus a diffused kicker light from the left which I place deliberately. Thus, I can give them a sense of direction when I tell them to turn their heads this or that way because of ...well, lights, layouts... art directors... anything they might meet in the future.

Yep, the girl has three shadows. This is owned to the move-anywhere-and-look-good lighting. Don´t do that in real life a.k.a. paid assignments


You know what? My Metz 40MZs lasted with ONE SET OF RECHARGEABLES except one, which I had to change. I worked between f/5 and f/5.6 (adjusted to taste) at ISO 400. I use the classic white 2700 mAh eneloops, ReCycko 2700s and Ansmann maXe 2700s. I took A THOUSAND SHOTS and the strobes kept working. I now have 977 photos in that folder and I deleted a lot of test shots and bad shot ON SET so I guarantee you I shot A THOUSAND FRAMES and only had to change one set of four batteries because they became a bit too lazy for my pace.

What´s the secret? I PAIR them. They share the load of lighting a big space, thus they recycle faster.

from a very different shoot a long time ago: paired strobes giving me double the power - or half the recycling time, any way you want it.


I used a B.I.G Multi-Blitzschiene (takes 4 hotshoe strobes) and a Lastolite Triflash (guess how many strobes that takes) on the two main lights and put two units on each. The kicker was done by only one flash.
Great thing is: you equip only one strobe in each set with your radio trigger, the other one can carry an optical slave or a trigger cable, because they share such a small space. CHEAPER! Also, each of the adapters is a swivel as well as an umbrella holder. Win.

Why did I only put two strobes on each, when one can carry four, the other one three? Yes, I do own enough 40MZ units to fill every slot in every adapter imaginable, but:

1. I want symmetrical power left and right for this shoot. So I decided on two on each side.
2. Much more important: DOUBLING the light means gaining 1 stop. 2 is double-1. But 3 ist not double anything. You can pair two strobes, but a third one would only add HALF A STOP to your whole setup!

Yes, I meter. On studio jobs, I meter. I don´t rely on my display and I don´t rely on Blinkies. You know why? It´s faster. The Gossen Variosix is nice, because when you push the meter button, it waits for any flash to go off - you don´t have to connect it to your trigger wires or buy Pocket Wizard compatible stuff to trigger a flash. Just wire up your strobes or trigger them via infrared. The Variosix will wait and measure as soon as you flash. 


So I went through these thoughts: You want to gang strobes in order to increase your stamina. You got one Multi-Blitzschiene and one Triflash. The Triflash carries max 3 strobes, the third one doesn´t do you much good else than confuse your power ratios. So... two units on each side will be perfect.

Why did I not pair strobes on the kicker light? Well, first of all, I was out of multiple-strobe-adapters and then, a kicker light bounces off of skin into your camera - that´s much more effective than light that has to reflect at 45 to 180° - which is every light that you´d say "lights the model". So I can use much lower power to achieve a great effect. You may have found that your rim lights can fire at much lower power than your key and fill for the desired effect.

If I remember correctly, I ran every strobe on 1/16 power, up or down a third.

Here´s the other light setup I used that day: one flash, TTL through a Calumet Hex 21 (which I love), filled by a Lastolite Trigrip below. The background is the same as in the other shots, but it appears much darker due to the close lighting on Kathi and the distance to the background. Videos have been made on that. Just google "Inverse Square Law".
TTL is doing the work for me here (adjusted down 2/3). I just have to change from a TTL cord to my "stupid" wireless trigger and it´s back to studio light, whole body, whole set.


Unfortunately, Metz has gone bankrupt two weeks ago. I still don´t support them because I buy their ancient relics second hand... It´s an amazing firm that makes strobes that support every camera manufacturer´s TTL system by cost-effectively changing the hot shoe adapter. They even support Leica and Sony! The lawyers are working on a plan to bring investors in, so I hope they don´t have to fire the support guy I called once... he went to fetch an old 40Mz from the archive and disassembled it to answer my specific question about some tech specs. OK now, if you as a photographer want to support a German family business who produce world-class quality strobes (as well as television sets et al.), go buy their newest TTL strobes. They are adaptable to your choice of camera on order. They are powerful. They are user-friendly. They are tough. And yes, they are heavy. NICE!

Tim

Tuesday, July 16, 2013

Removing A Filter That´s Stuck To Your Lens Or Adapter Ring

Hi folks,

I just saved my polariser - it had been stuck to the adapter ring I use for most of my lenses.

Of course, I did a quick research on the internet. There are also nice youtube vids about this. My combination of methods found was the most practical to me. But whatever you do: NEVER USE PLIERS ON STUCK FILTERS! You´ll ruin your threads and probably scratch or break the glass!

It doesn´t matter whether the filter is stuck to a lens or to an adapter ring.


You´ll need:

- a microfiber cloth as a working surface. A dishcloth or a towel will also do.
- a jar opener or a filter removal tool (you usually have only one, but will need two if you got filter and ring stuck together - this is only needed when you have a stuck ring because your hand can grab a lens nicely without tools.)
- some device to recreate the original conditions. My filter got stuck on a hot day, so I used a hairdryer to considerably warm things up. If stuck on a cold day, put things in the freezer for some time. Generally, any temperature warp in the materials will help!
- a (rather soft) rubberised cord. I used a piece of RCA cable, soft and sturdy.


Should you NOT have any jar opener or whatever means of grabbing, you can also press the whole combo filter down against your yoga mat. This´ll apply good grip. Of course, as in my case, with a polariser this won´t work, because it´s a revolving filter that won´t transmit any torque to the stuck thread.

1. freeze or hairdry your stuck combo until the change in temperature is at least sensible.

2. grab the lens with your hand or grab the ring with the jar opener. DON´T GRAB THE FILTER WITH A METAL JAR OPENER JUST BECAUSE THE RING IS CHEAPER TO REPLACE!

3. sling the cord around the filter and hold it firm so you can apply grip. With a polariser, of course, only grip the checkered thread ring, not the revolving ring. 

4. twist, et voilĂ !


Resume: Heat and careful appliance of torque did the trick for me and it´ll do even better if there are threads of metal and plastic involved. Just be careful not to break or scratch anything. The soft rubberized RCA cord was perfect for grabbing and twisting the ring.

Forget the rubber band methods. With a cable or cord you can apply all the force you need much more elegantly.

Sunday, June 23, 2013

Shooting the many faces of Richard Ruck and using ALL LIGHT OF DAY

Richard, a skilled cameraman, model and actor asked me to do a day´s session of photography for his z card.
We had a lot of ideas about what to stage and he, being familiar with behind-the-camera-work, was an eye-level partner in imagining and realising these shots. Michaela, a friend of his, did not only do all the make-up, but also proved to be a top-level moving lighting bipod, since she has a lot of film making experience. Basically, it was three picture maniacs working in the same direction while enjoying each other´s company. A perfect Sunday in Haidhausen, one of the many beautiful hearts of Munich.

Richard wanted some Shots he hadn´t done yet (he´d done some already). He´d bring all the props, including a Porsche, an Ibanez guitar and a surfboard. Our plan was to do:
- The Rock Star
- The Traditionally Dressed Guy
- The Business Man
- The Armed Secret Service Guy
- The Surfer

Off we go. Meeting at forenoon in Kunstpark Ost, a club area in Munich for the first Rock Star shots.
(PLEASE NOTE that I am showing you straight-out-of-camera-JPEGS without any retouching here!)


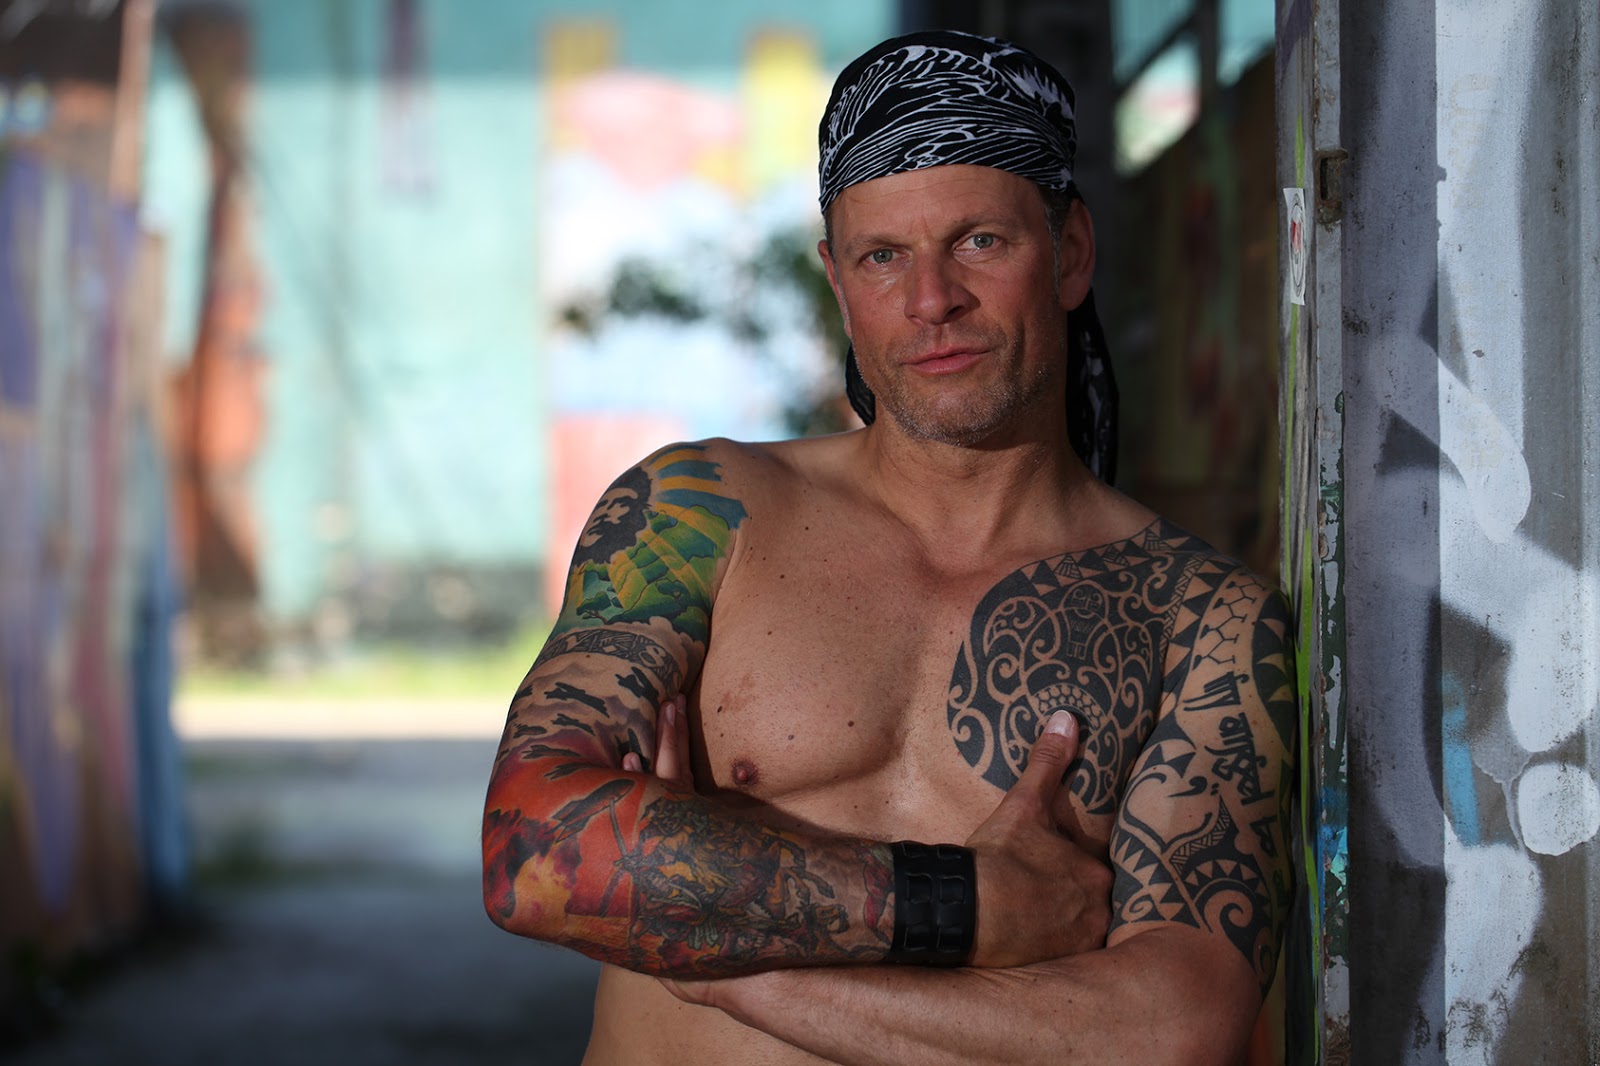
I knew beforehand that I was going to use all the light this hot sunday would give me. This incorporates the ugly (and mostly unusable) light of late forenoon. We started shooting at around 11am. I used no heavier gear than my trusted Metz 40MZ flashes and knew that they would not really be able to battle a summer days light if they were not bundled. So I decided to start with a large silver reflector which I gave to Michaela. We scouted a nice graffiti´ed wall and shot a few frames. Michaela is just out-of-frame to the left, giving Richard the full force of noon sun right into his face. I could take my picture at ISO100, f/3.2, 1/400 without taking care of flash sync. Easy start for me!

Note that I used a polarising filter for this shot to eliminate the sun´s reflection on Richard´s arm. He wanted to show his tattoos in the rock star pictures, but they would not have shown due to the sun´s reflection on his arm. This pattern of unusual portrait behaviour costs you something between two to three stops. No problem in full sun, but be sure to get a nicely coated (=expensive) filter to avoid flaring and ghosts. I shot this without any sunblocking shades and with a B&W multicoated linear pol filter.

If I had incorporated flash in this shot, I´d have had to work at sync speed, which is 1/200 with the EOS 5D. That´d given me one full extra stop of crap daylight I couldn´t have used for nothing.

By the way - I shot most of the session with my EF 2.8/100mm L IS USM which I love for its extraordinary sharpness, rigidity and versatility.

Next shot: topless!


Richard had not had any tattoo shots so far, so this was an important part of the session. I found a nice shade right next to our first location (LESSON: always park you car as close as possible and avoid moving ANYTHING as long as you can to retain quick access to your equipment even if conditions are tight!) and placed him there. I pretty much eliminated daylight with ISO100, f/3.2, 1/200 sync and let the bakground live, taking off the polariser. This required some flash (there was no daylight to bounce from any desired angle there). Hard men can take hard light, so I shot a Metz at him, some four meters from picture left at quarter power or so. That was that.

In comes: THE FIRST BONUS SHOT!


Bonus shots cost nothing, don´t take much time and come up in your mind quickly when you spot a chance which you´re prepared for anyway.
I fired the same bare flash at Richard, while looking up into the sun, lying on the ground myself.
This came to me like bang - I had him dressed the way he was, just moved flash, subject and myself and took five frames.

We moved to the next location, a wooden house in the middle of Munich to shoot the traditional dress setup.


Noon light prevented ANY setup but the one above. Also, there were mail boxes and numerous metal plates on the front of the historical building which I didn´t want to show or have to shop out. I could only place him in the shade and soften the remaining sunlight with a white diffusor, else it´d hit his leg and burn out completely. Some shots here.


Then, we did some shots in Sepia setting. LESSON: If on assignment, always shoot RAW and JPEG. The RAW file gives you full RGB editing capacities afterwards, retaining all there was in the original picture at the best quality your camera and lens can produce. If you want the result to be B/W or so, you can tweak the camera´s picture style to that mode and the JPEG will be a nice preview of what you´re going for. If you´re lucky (or skilled), the JPEG is the finished piece already without any photoshopping!


Some more shots, two meters to the right (still with the white diffusor overhead, blocking and softening the harsh sun)


BONUS SHOT No. 2! Turned around a bit to turn the soft main light into a soft edgy light and took three close-ups, not changing ANYTHING but the ANGLES and IN-CAMERA-CONTRAST SETTING (to taste).

Then, we went around the house where I found that the opposing (yellowish) building projected a nice even warm reflection into the backyard. The next two shots were done without any light modification or flash.


After that, we took a nice lunch break without wasting any time (as I mentioned before, mid-day sunlight is the ugliest light of day to work with, so there was NO way to waste any time - the light was just getting better from now on). LESSON: if things is crappy, take a break!!


Next thing to do was the business man shots. The order of outfits was dictated by the course of the sun vs. the locations and, even more important, the hair styling and shave! Richard shaved, had his hair done by Michaela and we went on. LESSON: always figure everything out according to inevitable changes and such. If the subject has to take a shave in order to change roles, his facial hair will be gone for the rest of the day. Also, the sun will move east to west every day. Think about all this before plannig a shoot! ISO100, f/6.3, 1/200 sync.


These shots were again taken with a polariser. That gave me another two or so stops to control ambient light and also control the reflections on the building, which was in full sun, reflecting the bright, lightly clouded sky. Subject light comes from a single reflecting umbrella with two MZ-40 at half power each, right out-of-frame.
Of course, the umbrella is a soft light, but due to proximity and exposure, the falloff of the light is so dramatic that we have a hard-contrast look with soft edges.
LESSON: When using flash, sync speed and maximum aperture determine your exposure minimum (when going for shallow depth-of-field). If you want less ambient, you will have to use a (ND) filter, but then you´ll have to power up your speedlights to cope with the filter! If you don´t want endless recharging times, double them up. Tape them together, whatever. Waiting time between two frames was long with this setup (it helps to have a flash that beeps when ready!), but no problem with Richard: he´s patient and always ready to strike a pose. All shot at 6.3, 1/200 sync. The difference in brightness comes from slight movements of the subject (light falloff - remember! Unedited JPEGs here!)


The next two shots were done around the corner, in the shade. Thus, I used f/5 at 1/200, powered my flashes down (still two in one umbrella) and discarded of the polariser, because the ambient wasn´t too powerful here anymore. Look at the change of overall appearance:


Now that I allow more daylight in, I use the reflected sunlight from the opposite building as a a soft edge and fill in from the left with my umbrella. With the sun being tad stronger than my flash, the black suit shows nice structure. ISO100, f/5, 1/200 sync. LESSON: light-to-subject-distance is a much quicker and more powerful control of light power. Use it wisely and don´t let it accidentally ruin your shot!


Woo-hoo, umbrella, tripod and sandbag in the shot! No matter: I´ll crop that out.


The greenish look in the last shot is produced by modern windows´ chemical coating! Nice look, anyway. Still f/5 at 1/200, ISO100 with my 2.8/100.
LESSON: always ask for permission if you shoot on somebody´s grounds. Here, we asked the guardsmen is we could do some shots and they replied, that the company does not appreciate it, but agreed we go on if we didn´t show too much of the architecture. I showed them my shots after we finished and they complied with the compositions. You don´t want to be thrown out in the middle of a good shoot just because the janitor called the police!

Enter James Bond.


Some unknown parking deck, a Porsche, a fake gun and a nice suit make for a good Bond! Being able to work in the shade again, I decided to rake two bare flashes across the scene, one from the left behind the car and one from the right, both a few meters away and zoomed out. The frontal fill comes from natural light. Although I found a strong composition with Richard´s face right out of the middle where all the lines converge, we found the background to be too disturbing. I wanted to incorporate some movement to blur everything but Richard´s face. ISO1250, f/5, 1/100


Here´s the old trick: Shade your subject as good as you can (Michaela held up a black flag), stretch your shutter time so you can incorporate movement (1/8th or so will do nicely) and zoom during the exposure with shutter synch on 2nd curtain. This´ll freeze the subject while blurring the background. Of course there will be some shadow artifacts around the face, but overall drama makes up for that. (all shots here with the f/4 17-40 L USM) ISO1250, f/5, 1/13 LESSON: a black flag can sometimes be of as much use as a white or silver reflector! Best, if you got a huge example of these 5-in-1-things. Mine is 2 square meters and features white, silver, gold, black and diffusing surfaces. If you´re on your own, a Tri-Grip may be your choice.


...another quick setup...


...and the classic Bond shot! Basically, this is a BONUS PICTURE, just a quick idea. Two flashes on tripods far left and right behind Richard give a strong rim light, mimicking the daylight effect behind him. Michaela with silver reflector  just above the camera and slanted down 45 degrees did the fill. 2.8/100mm again.


And here´s another BONUS PICTURE with only one flash simulating daylight and the white column providing the fill. Richard´s Idea.

All these shots were meant to be Black & White in the end, so I set the picture style to BW, yellow filter etc. to get good preview JPEGS - still retaining the RAW files. I don´t mind blowing out the whites in this case and also I don´t mind some grain, so I shot at ISO1250 in order to get decent shutter times while still having a living background. Ah, the freedom of Black & White!


Last shot for Mr. Bond and more of an experiment which I think worked out well. Two bare flashes fired from left and right on Richard and the Porsche. f/4 17-40mm L USM. There´s a lot of room for technical interpretation here, so eventually I´ll darken the sky, dodge the rims, lighten the legs and so on. But the BW JPEG gives you a good idea on where to start. I think I shot with a (in-camera) red filter at sync speed, so the "natural" sky is already the darkest possible. Could have gone with the polariser, too, but this would have given me an even stranger gradient across the sky and I would have had to take many, many shots to find out the correct setting of the filter for good reflections on the car while losing good light and straining my batteries.


On to the last setup:


A bit strained by the hot sun of day, we went on to the last location at beautiful river Isar. The sun was about to vanish (you can see the shadow creeping in from the left in the shot above), but I wanted to show some backlit wild water. The water was rather high from the last weeks´ rain and gave wonderful spray right under the waterfall. I pulled out my silver reflector, took a few quick shots at 1/640th. Then, I produced my flash, went down to sync speed and fired some shots, sitting on the steep wall of the barrage a bit above Richard, holding my flashgun high left. I somehow had lost the will to produce natural light, but nonetheless I think it looks pretty decent. Although anybody who knows about photography will claim that this was either shot in a studio and shopped in or shot in front of a photo paper of hawaiian waves, it´s just a small turn away from the above shot. LESSON: Always carry that silver reflector with you! It´s quicker to setup than a remote-controlled flash, can be positioned by hand very quickly in most cases, gives you what-you-see-is-what-you-get-light at once and provides fill and/or main light so natural that it can only be copied with a strongly modified flash! When panic strikes because the sun fades, this comes in handy.


That´s about it! I hope you learned a thing or two and enjoyed my pictures. Comments please!

Richard can be booked for your film, ad campaign and/or movie production under richard-ruck.tv and  rickruck(at)gmx.de. The new pics will be up on his site soon.