Sunday, June 23, 2013

Shooting the many faces of Richard Ruck and using ALL LIGHT OF DAY

Richard, a skilled cameraman, model and actor asked me to do a day´s session of photography for his z card.
We had a lot of ideas about what to stage and he, being familiar with behind-the-camera-work, was an eye-level partner in imagining and realising these shots. Michaela, a friend of his, did not only do all the make-up, but also proved to be a top-level moving lighting bipod, since she has a lot of film making experience. Basically, it was three picture maniacs working in the same direction while enjoying each other´s company. A perfect Sunday in Haidhausen, one of the many beautiful hearts of Munich.

Richard wanted some Shots he hadn´t done yet (he´d done some already). He´d bring all the props, including a Porsche, an Ibanez guitar and a surfboard. Our plan was to do:
- The Rock Star
- The Traditionally Dressed Guy
- The Business Man
- The Armed Secret Service Guy
- The Surfer

Off we go. Meeting at forenoon in Kunstpark Ost, a club area in Munich for the first Rock Star shots.
(PLEASE NOTE that I am showing you straight-out-of-camera-JPEGS without any retouching here!)


I knew beforehand that I was going to use all the light this hot sunday would give me. This incorporates the ugly (and mostly unusable) light of late forenoon. We started shooting at around 11am. I used no heavier gear than my trusted Metz 40MZ flashes and knew that they would not really be able to battle a summer days light if they were not bundled. So I decided to start with a large silver reflector which I gave to Michaela. We scouted a nice graffiti´ed wall and shot a few frames. Michaela is just out-of-frame to the left, giving Richard the full force of noon sun right into his face. I could take my picture at ISO100, f/3.2, 1/400 without taking care of flash sync. Easy start for me!

Note that I used a polarising filter for this shot to eliminate the sun´s reflection on Richard´s arm. He wanted to show his tattoos in the rock star pictures, but they would not have shown due to the sun´s reflection on his arm. This pattern of unusual portrait behaviour costs you something between two to three stops. No problem in full sun, but be sure to get a nicely coated (=expensive) filter to avoid flaring and ghosts. I shot this without any sunblocking shades and with a B&W multicoated linear pol filter.

If I had incorporated flash in this shot, I´d have had to work at sync speed, which is 1/200 with the EOS 5D. That´d given me one full extra stop of crap daylight I couldn´t have used for nothing.

By the way - I shot most of the session with my EF 2.8/100mm L IS USM which I love for its extraordinary sharpness, rigidity and versatility.

Next shot: topless!
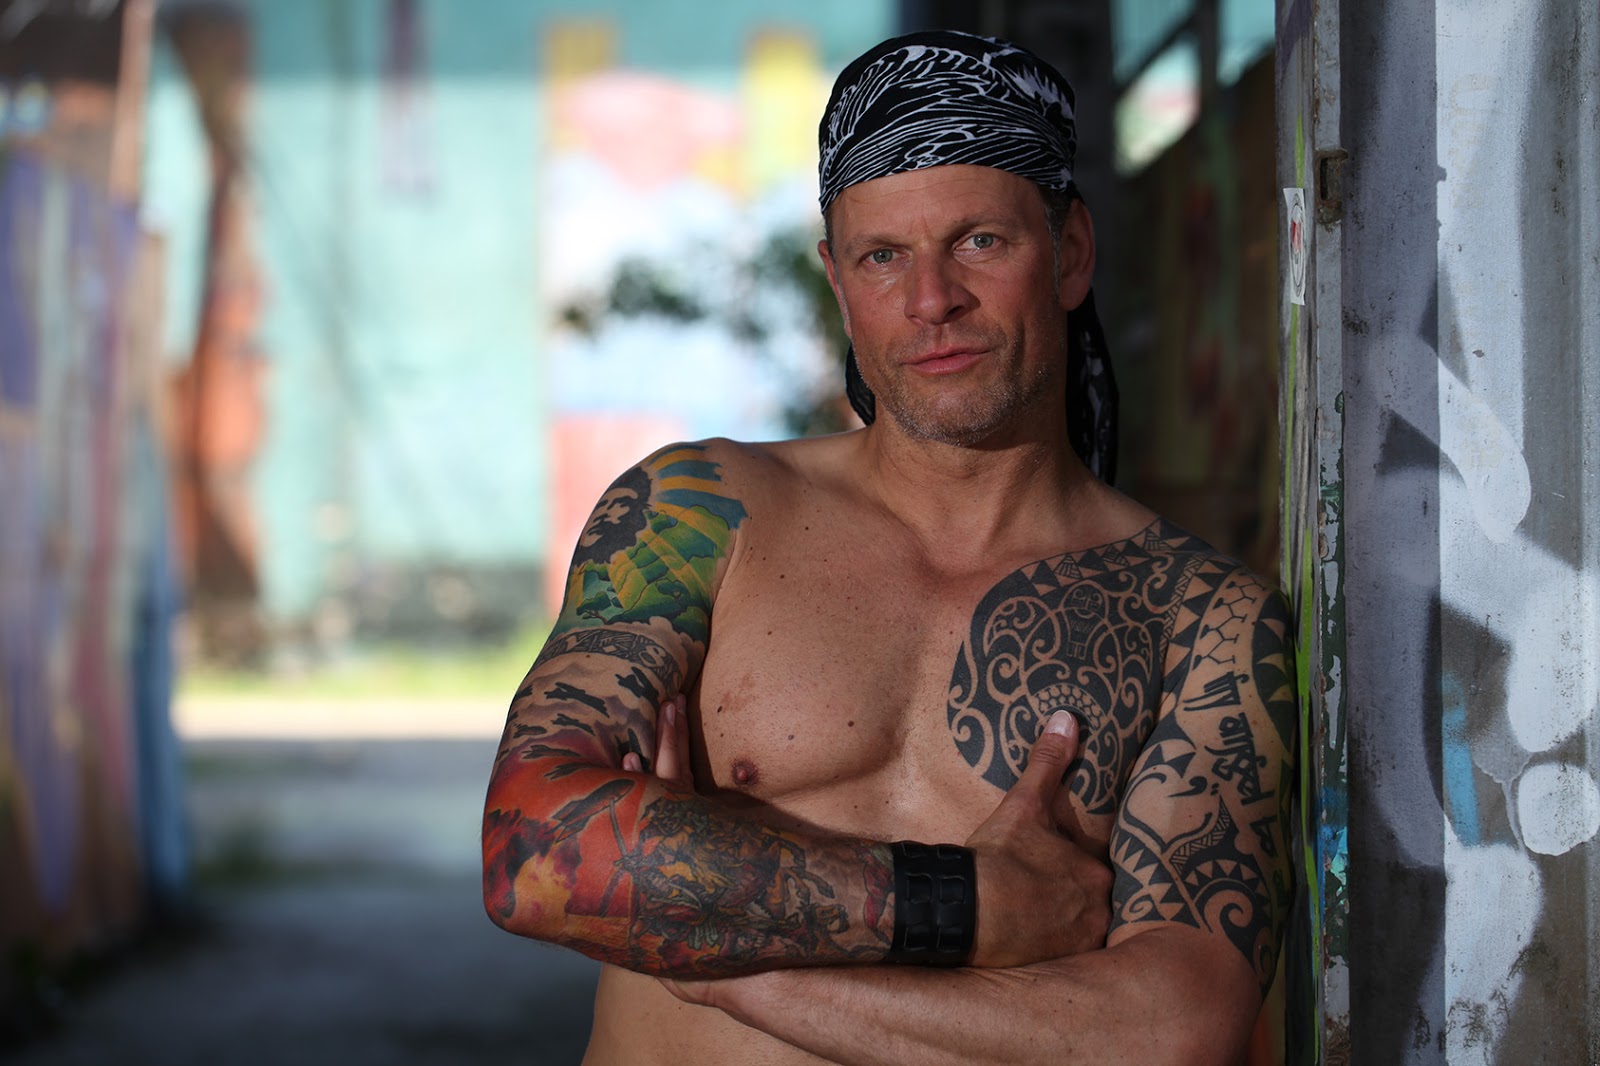

Richard had not had any tattoo shots so far, so this was an important part of the session. I found a nice shade right next to our first location (LESSON: always park you car as close as possible and avoid moving ANYTHING as long as you can to retain quick access to your equipment even if conditions are tight!) and placed him there. I pretty much eliminated daylight with ISO100, f/3.2, 1/200 sync and let the bakground live, taking off the polariser. This required some flash (there was no daylight to bounce from any desired angle there). Hard men can take hard light, so I shot a Metz at him, some four meters from picture left at quarter power or so. That was that.

In comes: THE FIRST BONUS SHOT!


Bonus shots cost nothing, don´t take much time and come up in your mind quickly when you spot a chance which you´re prepared for anyway.
I fired the same bare flash at Richard, while looking up into the sun, lying on the ground myself.
This came to me like bang - I had him dressed the way he was, just moved flash, subject and myself and took five frames.

We moved to the next location, a wooden house in the middle of Munich to shoot the traditional dress setup.


Noon light prevented ANY setup but the one above. Also, there were mail boxes and numerous metal plates on the front of the historical building which I didn´t want to show or have to shop out. I could only place him in the shade and soften the remaining sunlight with a white diffusor, else it´d hit his leg and burn out completely. Some shots here.


Then, we did some shots in Sepia setting. LESSON: If on assignment, always shoot RAW and JPEG. The RAW file gives you full RGB editing capacities afterwards, retaining all there was in the original picture at the best quality your camera and lens can produce. If you want the result to be B/W or so, you can tweak the camera´s picture style to that mode and the JPEG will be a nice preview of what you´re going for. If you´re lucky (or skilled), the JPEG is the finished piece already without any photoshopping!


Some more shots, two meters to the right (still with the white diffusor overhead, blocking and softening the harsh sun)


BONUS SHOT No. 2! Turned around a bit to turn the soft main light into a soft edgy light and took three close-ups, not changing ANYTHING but the ANGLES and IN-CAMERA-CONTRAST SETTING (to taste).

Then, we went around the house where I found that the opposing (yellowish) building projected a nice even warm reflection into the backyard. The next two shots were done without any light modification or flash.


After that, we took a nice lunch break without wasting any time (as I mentioned before, mid-day sunlight is the ugliest light of day to work with, so there was NO way to waste any time - the light was just getting better from now on). LESSON: if things is crappy, take a break!!


Next thing to do was the business man shots. The order of outfits was dictated by the course of the sun vs. the locations and, even more important, the hair styling and shave! Richard shaved, had his hair done by Michaela and we went on. LESSON: always figure everything out according to inevitable changes and such. If the subject has to take a shave in order to change roles, his facial hair will be gone for the rest of the day. Also, the sun will move east to west every day. Think about all this before plannig a shoot! ISO100, f/6.3, 1/200 sync.


These shots were again taken with a polariser. That gave me another two or so stops to control ambient light and also control the reflections on the building, which was in full sun, reflecting the bright, lightly clouded sky. Subject light comes from a single reflecting umbrella with two MZ-40 at half power each, right out-of-frame.
Of course, the umbrella is a soft light, but due to proximity and exposure, the falloff of the light is so dramatic that we have a hard-contrast look with soft edges.
LESSON: When using flash, sync speed and maximum aperture determine your exposure minimum (when going for shallow depth-of-field). If you want less ambient, you will have to use a (ND) filter, but then you´ll have to power up your speedlights to cope with the filter! If you don´t want endless recharging times, double them up. Tape them together, whatever. Waiting time between two frames was long with this setup (it helps to have a flash that beeps when ready!), but no problem with Richard: he´s patient and always ready to strike a pose. All shot at 6.3, 1/200 sync. The difference in brightness comes from slight movements of the subject (light falloff - remember! Unedited JPEGs here!)


The next two shots were done around the corner, in the shade. Thus, I used f/5 at 1/200, powered my flashes down (still two in one umbrella) and discarded of the polariser, because the ambient wasn´t too powerful here anymore. Look at the change of overall appearance:


Now that I allow more daylight in, I use the reflected sunlight from the opposite building as a a soft edge and fill in from the left with my umbrella. With the sun being tad stronger than my flash, the black suit shows nice structure. ISO100, f/5, 1/200 sync. LESSON: light-to-subject-distance is a much quicker and more powerful control of light power. Use it wisely and don´t let it accidentally ruin your shot!


Woo-hoo, umbrella, tripod and sandbag in the shot! No matter: I´ll crop that out.


The greenish look in the last shot is produced by modern windows´ chemical coating! Nice look, anyway. Still f/5 at 1/200, ISO100 with my 2.8/100.
LESSON: always ask for permission if you shoot on somebody´s grounds. Here, we asked the guardsmen is we could do some shots and they replied, that the company does not appreciate it, but agreed we go on if we didn´t show too much of the architecture. I showed them my shots after we finished and they complied with the compositions. You don´t want to be thrown out in the middle of a good shoot just because the janitor called the police!

Enter James Bond.


Some unknown parking deck, a Porsche, a fake gun and a nice suit make for a good Bond! Being able to work in the shade again, I decided to rake two bare flashes across the scene, one from the left behind the car and one from the right, both a few meters away and zoomed out. The frontal fill comes from natural light. Although I found a strong composition with Richard´s face right out of the middle where all the lines converge, we found the background to be too disturbing. I wanted to incorporate some movement to blur everything but Richard´s face. ISO1250, f/5, 1/100


Here´s the old trick: Shade your subject as good as you can (Michaela held up a black flag), stretch your shutter time so you can incorporate movement (1/8th or so will do nicely) and zoom during the exposure with shutter synch on 2nd curtain. This´ll freeze the subject while blurring the background. Of course there will be some shadow artifacts around the face, but overall drama makes up for that. (all shots here with the f/4 17-40 L USM) ISO1250, f/5, 1/13 LESSON: a black flag can sometimes be of as much use as a white or silver reflector! Best, if you got a huge example of these 5-in-1-things. Mine is 2 square meters and features white, silver, gold, black and diffusing surfaces. If you´re on your own, a Tri-Grip may be your choice.


...another quick setup...


...and the classic Bond shot! Basically, this is a BONUS PICTURE, just a quick idea. Two flashes on tripods far left and right behind Richard give a strong rim light, mimicking the daylight effect behind him. Michaela with silver reflector  just above the camera and slanted down 45 degrees did the fill. 2.8/100mm again.


And here´s another BONUS PICTURE with only one flash simulating daylight and the white column providing the fill. Richard´s Idea.

All these shots were meant to be Black & White in the end, so I set the picture style to BW, yellow filter etc. to get good preview JPEGS - still retaining the RAW files. I don´t mind blowing out the whites in this case and also I don´t mind some grain, so I shot at ISO1250 in order to get decent shutter times while still having a living background. Ah, the freedom of Black & White!


Last shot for Mr. Bond and more of an experiment which I think worked out well. Two bare flashes fired from left and right on Richard and the Porsche. f/4 17-40mm L USM. There´s a lot of room for technical interpretation here, so eventually I´ll darken the sky, dodge the rims, lighten the legs and so on. But the BW JPEG gives you a good idea on where to start. I think I shot with a (in-camera) red filter at sync speed, so the "natural" sky is already the darkest possible. Could have gone with the polariser, too, but this would have given me an even stranger gradient across the sky and I would have had to take many, many shots to find out the correct setting of the filter for good reflections on the car while losing good light and straining my batteries.


On to the last setup:


A bit strained by the hot sun of day, we went on to the last location at beautiful river Isar. The sun was about to vanish (you can see the shadow creeping in from the left in the shot above), but I wanted to show some backlit wild water. The water was rather high from the last weeks´ rain and gave wonderful spray right under the waterfall. I pulled out my silver reflector, took a few quick shots at 1/640th. Then, I produced my flash, went down to sync speed and fired some shots, sitting on the steep wall of the barrage a bit above Richard, holding my flashgun high left. I somehow had lost the will to produce natural light, but nonetheless I think it looks pretty decent. Although anybody who knows about photography will claim that this was either shot in a studio and shopped in or shot in front of a photo paper of hawaiian waves, it´s just a small turn away from the above shot. LESSON: Always carry that silver reflector with you! It´s quicker to setup than a remote-controlled flash, can be positioned by hand very quickly in most cases, gives you what-you-see-is-what-you-get-light at once and provides fill and/or main light so natural that it can only be copied with a strongly modified flash! When panic strikes because the sun fades, this comes in handy.


That´s about it! I hope you learned a thing or two and enjoyed my pictures. Comments please!

Richard can be booked for your film, ad campaign and/or movie production under richard-ruck.tv and  rickruck(at)gmx.de. The new pics will be up on his site soon.

Monday, January 14, 2013

Some Truth about Strobist softbox work

Today, I´d like to talk to you about some facts in light modifying. With the rise of speedlight photography, the invention of flash brackets, speedring adapters and all sorts of toys, so many fellows went out, saying "now I´ve got a perfect studio setup for no money at all" - but that´s not the entire truth.

---NOTE TO EVERYBODY---

Please don´t be offended! I´m not going to rant about your favourite way of light shaping. I use all these techniques listed here myself and they work PERFECTLY. It´s just that I want to show you some minor flaws in the whole idea of modifying speedlights. Let´s go!


First, let´s have a look at the basic studio strobe compared to a speedlight.


The light emission characteristics are fundamentally different. The speedlight was made to project light into the subject´s direction when mounted on the camera. You can´t change that - it was invented to do so! Of course, you can zoom the head, but then it´s still built in a housing with a reflector and a fresnel screen. The studio strobe, in contrast, was invented to provide "REAL BARE BULB" light, ready for modification (that´s because it HAS a real bare bulb in the true meaning of the word).

Note the weird spray pattern of the Sigma EF 530 DG Super:


Rectangular, weird and pretty useless unless you modify it heavily. Point it up a bit and it gives a nice, yet strange flame shape on that blue wall, but that´s it. Not very useful if used naked and that holds true to every speedlight. So there´s not much use for barn doors or normal reflectors. It´ll always throw out this useless pattern. Okay, but what about a softbox?

Let´s see what the studio strobe does inside a softbox:


Okay, so you see, because of its bare bulb characteristic, it emits light about everywhere in the box from where it bounces back and around, being diffused twice before it leaves the front of the box. No matter how much you squint (or stop down, that is), you will always see a perfectly even white surface, when you look at the front diffusor. Here´s what a speedlight does:

The beam is directed forward, even if you pull out your diffusor panel and zoom back to 21mm or whatever you can do. There will be a hotspot on the inner diffusor which will continue to the front diffusor. It won´t be visible when you look at it or photograph it with flash power relatively high to the chosen f-stop, but when you see a reflection of it, the hotspotting becomes visible (this goes for cooking pot photography, shots of any other shiny reflective object and, sadly, for portrait photography, where it can be seen in the catchlights in the person´s eyes. Any reflection swallows a stop or two, revealing the effect). The inner silver coating doesn´t help much with diffusion here, because the spdlght doesn´t send any direct light there.
I used a speedlight in a softbox as white blown-out background for my pumpkin shot. I had to diffuse again, using a large WD sheet and still had to ´shop it a little to get rid of the vignetting. See "The High-Key Still Life", below.

What else can we do?

Many of you will use a reflective or shoot-through umbrella, because they produce wonderful light and are a cinch to storen transport and set up. But again, there is a hotspot. In practice, it doesn´t matter, but again, you´ll be able to see it in the catchlights.


Here´s my EOS 3 again. It was lit with umbrellas. The light on the device is flattering, but look inside the lens: you can clearly see that there are two hotspots inside that umbrella structure. Problem is, they are asymmetrical due to the off-ness of the flash head (it´s always above the umbrella center and that´s where the hotspot rests). This only shows up in less confusing reflections than those inside a front lens. Unfortunately, peoples´ eyes reflect VERY clear.

Okay, so what about a simple WD gel as a diffusor?


Now, this ist what most people don´t get. You want flattering light? You need a BIG light source. It´s very simple. Putting on a WD gel, a yogurt cup, Gary Fong stuff or whatever is out there, is a great idea for event photography and everything else where you are forced to keep your flash on-camera and move rapidly. Heck, even pulling out your bounce card helps! But remember: you don´t increase the size of your light source, you don´t lose the ugly tiny catchlight that the strobist-man is up against - you only spill more light everywhere else. Of course, you produce much, much nicer shots than if you´d flash everybody directly in the face. But you lose a lot of power. The WD gel even reflects a lot of light to the rear.

"So... how about a speedlight with WD gel inside a softbox. Should give me less hotspotting, huh?"

Um, yes, But only if you can afford the loss of power. Feel free to do so! But for now, let´s not talk about a simple gel as a light shaping tool.

"Damn, is there nothing I can do to mimick a real studio strobe?"

Let me think... you´d need a light shaper that blocks the direct flash from the speedlight and then diffuses it nicely.
Enter the BEAUTY DISH!

There you go. The speedlight-powered dish will only show absolutely marginal differences from one with a studio strobe inside. Plus, it´s a great light shaper. Put the white sock on and it´s a much better softbox than a softbox for potraiture. It also takes honeycomb grids to prevent light spill. It gives flattering light. Add to cart.

"Any last words then?"

Yes. Bounce! Bounce against ceilings, bounce against handheld reflectors, against white kitchen cupboards, washing machines, refrigerators, utility bills, bags of cocaine and letters of resignation. As long as it´s white, it´ll do a good job.

I hope you enjoyed reading. Thanks for your time!

ADDENDUM:  I must add something to this post. Let´s see a shot of a Bowens Beauty Dish in action with a studio strobe:


I guess, that´s what a dish is supposed to do. Now, let´s bring a speedlight-to-Bowens-adapter into play. It looks like this:


On with the dish, starting with the zoom head of the flash at 35mm:


Whoops! See what´s wrong? There´s spill around the deflector and I didn´t hit the direct center of the deflector, so there´s a dark spot as well. (Damn! I wish I hadn´t done that bloody test...) Okay, let´s zoom the flash to 85mm to see if we can stay within the deflector disc:


Ummmm....no. Let´s make a desperate move. This is an original Bowens dish, so I can take off the deflector and put it on in reverse. So I´ll turn convex into concave. That should help spray light into the dish a bit more. Also, I can push it one step closer to the flash, becaue there is a second recess in the rods that hold it.

still 85mm, but deflector disc reversed and pushed in

Thank God, that dunnit.

I haven´t used a real dish so far, but the very similar Bowens Softlite Reflector which not only has smoothed silver finish inside, but also two layered deflector shields. Thus, I never had a problem with spill from a speedlight.

Okay, note to everybody including myself: Before you get into the cost and hassle of adapting your flash to a real dish, just to find out that its quite a pain getting it right - go and get yourself a Calumet Hex21, Aurora or any other collapsible hexagonal box designed for speedlight use. They are fantastic, I own the Hex21 myself and have seen an Aurora in action. Also, a dish doesn´t fold... more than once.

Monday, August 27, 2012

The High-Key Still Life

One day, I decided to shoot a nice desktop background for my wife´s new computer. Since it was autumn then, pumpkins seemed just right. I wanted the shot to be high-key, so I wanted a white background and these fancy reflections that everyone is trying to fake with Photoshop right now. Since most pumpkins are of a yellow-orange tone, I decided to include a contrasting color. What is more obvious than pouring blue dispersion paint over a pumpkin?

Here is the result. It is a no-shopped straight-out-of-camera JPEG.


The backdrop is a 70x140cm softbox with one of my trusted Metz 40MZ flashes, radio triggered by Hähnel Combi TF in it. I had to clip a sheet of half WD in front of it to eliminate the visible wrinkles in the front diffusor (tracing paper will do, too). The key light for the pumpkins is another 40MZ, bare bulb from the right and just a bit higher than the subject.

Of course, you can go the traditional way and light a white sheet of paper with two angled softboxes. But the way of using the ´box itself as backdrop saves you space and work. Of course, you can fire any light through two or three sheets of tracing paper, even your desktop lamp will do. But you will have to raise ISO then, since you don´t want the motion of the color to blur. Strobes simply have more power than anything you can muster in your household.

I chose a power setting (which I don´t remember) for that strobe and adjusted exposure taking test shots and watching my Canon 40D´s overexposure warning in the instant playback. Close the aperture step by step, until you have a white background that does not overexpose in every area. This is how you do it best, because you avoid the flash that looks directly in your lens to cause purplish blooming around the subject, softening the whole scene and screwing up contrast. If you want to work the traditional way (or shoot film), you can also meter the light. You´d need 2 stops more on the background than you get from the key light (i.e. the light that actually lights the subject). The best way would be spot metering with a gray card in place of the subject and using a meter that has an engraved zone scale. Put the background "white" to zone IX, the subject light to zone V and go. Shooting slide film, play safe and bracket downward.

With speedlights in a softbox, there is always some hotspotting. Speedlights direct their light to the front. Every speedlight does that. Studio strobes don´t. They have true bare bulbs that really behave like a lightbulb in your regular lamp at home and emit light without directing it. A speedlight will always create a hotspot in any diffusor, because it is designed to emit light forward, not backward or to the sides.
I placed the hotspot in my setup in the middle just above the pumpkins. In fact, you can see some falloff to the lower corners of the backdrop which does not really matter in the final shot or print and can be shopped out easily. But I´m pretty much of a slide film shooter (work-cleanly-and-leave-tings-as-they-are) so I like it and leave it like that.

The pumpkins are resting on a sheet of white acrylic glass which creates the beautiful reflections without any Photoshopping. This means that you can get only as many shots as you have corners, sides and numbers of identical acrylic glass sheets. You just won´t be able to clean up the color mess good enough to not piss you off for the next try. There will be residue. Just buy two more, so you can keep going for a while before it´s time for a coffee and cleaning break for the whole team.

Oh yes, talking about team! You need someone to pour the color. Or you build some remote-controlled mechanism that can be adjusted to pour the right amount in exactly the right place that you can control with some sort of foot pedal and... oh well, just get someone to do it. It´ll save nerves.

We employed a freezer bag from which we cut off a corner. Filled with paint, it´ll give a nice stream that can be controlled by your helper. Don´t cut off too much and test the stream before screwing your most beautiful pumpkin and the damn expensive acrylic glass sheet! Also, cover everything with garbage bags and newspaper. Cover more than you think might be right. Play safe. Hand your helper some rubber gloves.

It is important to try out the frame rate that you can shoot with the flash power you have chosen. Nothing worse than shooting some cool frames of pouring paint and then finding out that on the best shot one of your flashes didn´t fire. Try and find a rhythm that allows your strobes to recycle. Here are the shots before and after the winning shot:

Paint flowing behind stipe and a little too less paint.

Too much paint already - game over for pumpkin and acrylic glass.


Always shoot at the fastest sync speed possible and keep your working lights down. It keeps the room light from effectively illuminating the scene. Although it´s not really "freezing motion" to shoot slow flowing paint, you don´t want any ghost images here but a clean, crisp shot. Use a tripod and arrest everything safely. Compose your shot thoroughly. Clean your acrylic sheet with glass cleaner and a lint-free cloth beforehand. Play safe and don´t screw up your carpet. Remember, these are all unedited JPEGs from my camera and I think that they look pretty decent. That is due to good preparation.


Saturday, August 25, 2012

Shooting the Pros

I was assigned to shoot some frames for the up-and-coming IMAPRO, the International Music Academy for Professionals based in Munich, Germany. They are working to be one of the leading academys for musical education in Germany, harnessing a fresh training system for drummers and still developing revolutionary learning and motivation methods for numerous other instruments.

See their website under http://imaproacademy.com/ and learn about their new project here.

The assignment involved three drum coaches, the founder and a picture for the drum coaching flyer.

Here is the shot for the flyer. All pictures are RAW developed and only edited a bit for contrast, colour and sharpness. They were all shot on a EOS 5D MKII with the fabulous and ever-so-sharp Canon EF 100mm f/2.8 L IS USM Macro. Lights were my beloved Metz 40MZ strobes.

http://imaproacademy.com/ -- http://www.facebook.com/imaproAcademy
This is a nice-looking promotional shot, isn´t it? Well, here´s the story. I found myself in a rented rehearsal room, crammed with equipment from numerous bands, walls covered with egg-carton rubber foam. Hardly any room to move and no way to shoot nice frames without either a) leaving background things black, b) incorporating and lighting what is there or c) going wild with lights. And this is what I did with this shot.

I knew that if I showed the room the way it was, it would look super-crappy to any viewer. Although musicians might recognise the location as a musician´s trusted workspace, the general public would simply be repelled by its crummy looks. There was no way to produce decent-looking portraits here, simply because of the lack of space and because I had only brought a wee bit of white background paper. Although the walls were covered with near-black foam material I would have to spare out the mirrors, Coca Cola signs, lightbulbs and pieces of amplifiying equiment that covered ninety percent of the walls (or go for many hours of Photoshop time, nah!). So I decided to go for a backstage look for the whole set of pictures, incorporating the nice contrast of neutral and blue light, implying some sort of concert hall setting and indeed showing what I could find to fit my frame.

The subject on the flyer is lit by a 90x90cm softbox without the front diffuser which makes for a nicely defined light. the figure of the resting drummer is then only highlighted by a blue-gelled bare flash from high right behind. Both lights can be distinctly seen in the reflection in the chrome-plated stool legs (see my post about figuring out someone else´s light).

The basic setup for any other shot in this series is quite the same. I mostly let the softbox illuminate all of the scene. Sometimes I added a third light to add some accent.

There are three more lights in the flyer setup, all bare flashes. The ivory finished drum surfaces are lit by one light from high left (which also creates the nice BOKEH´d reflections from the chrome rims), the red accent in the drums comes from a red-gelled light from high left behind and the rubber foam covering the wall gets a blue spot from a sky blue gelled flash resting on the floor very close to the wall (accentuating the structure of the foam material).

As you can tell from my description, there are two totally individual setups for either fore- and background. This is due to the old rule of not lighting anything that you don´t have in your frame. I used every inch I had, myself leaning against one wall, framing the shot by moving the model and having the drum set in its natural place, close to the opposite wall. Every light in the shot is also as close to the wall as the light stands allowed me.

Here are the portrait shots of the drum coaches. Believe me, I used every corner of the location I could use. Having to shoot another pic there would give me serious problems. Of course, everyone holds his or her sticks to show their weapon of choice and noise.

Dan
Manu

Dirk

Maxi

The lighting setup, as described above (adding a light behind the rack and a blue fill with Manu and swapping the blue kicker light for an umbrella fill with Dan, while letting the blue kicker fill the aisle from behind a corner far behind, left) can be seen below. IT IS SIMPLE! Also, I incorporated equipment parts as blurred foreground for Dirk (Hi  Hat) and Manu (microphone stand), which makes a picture more interesting quite often. In the shot of Dan, I also dropped the exposure time down to 1/125th to let the existing light in the back live a little. Otherwise, I used the 5D´s maximum sync speed of 1/200 to eradicate all of the existing artificial light (you usually check first whether your f-stop, speed and ISO settings will turn any unflashed shot black. If so, you´re fine with what you´re at and can start to place some strobes).


Working with strobes instead of a portable studio light system always gives us decently small depth-of-field at close distances, unless we trade reasonable recycling times for power. But this helps us create interesting images with blurred back- and foregrounds anytime we have to spice up a disastrous-looking location. Remember, the whole place, including the drum kit and the aisle, looked terrible and kludgy. Of course, I could have produced nice and clean portraits against white background, which I thought I was assigned to do. But a bit of thinking and tinkering with lights produced these vivid, interesting images that fit the general spirit of the IMAPRO very well. Thanks to digital technology, we were able to discuss every single subject after a few test shots, so I was assured that the customers would be satisfied any time.


Monday, January 16, 2012

Strobist Business Portrait

A few weeks ago, I was on assignment to shoot a business portrait of Ulrich Loechter, founder of the Loechter Company, a Munich-based business consultancy. I had another shoot going at the same place, so setup took me less than ten minutes including a few test shots featuring my own self.

I opted for a very simple, yet traditional three-point setup. Let´s look at it first:

Note: On the 40MZ, power setting go 1 - 2^ - 2 - 2_ - 4^ - 4 - 4_ ...256. This is the power equivalent in thirds of a stop. Thus, "4_ " means 2 1/3rd steps down from full power, "8" means 3 stops down. So the kicker was actually 2/3 of a stop stronger, more focused and hitting a silver reflector. A lot more punch than the key light! But remembering that we photogs usually shoot persons against the sun when outdoors, we find there´s nothing wrong about a strong kicker. Uh... ISO 20? I´m sorry, of course, I mean ISO 200!


A three-point setup consists of a main (key) light from the front of the person (not from the camera, but the person´s face!), a kicker light to give a nice edge from behind and a fill light that fills in shadows.
Although in outdoor photography, a fill light CAN come from the camera, in studio photography you would usually set it up so that it marks the right-angle-point in a right triangle with the two other lights. You may have noticed that I didn´t use a flash but a simple white reflector. It catches some light from either key and kicker light and throws it in the general direction of the person, giving a smooth and discrete fill for the shadows while retaining the beautiful structures of both face and clothing.
You will also have noted that I didn´t take care of lighting the wall! In the picture you will see that there is a slight blue shade in the top corner, but I didn´t bother. Should it not match the customer´s wishes, I´d clear that in Photoshop. Luckily, it did. Please note that this is a direct-from-camera-JPEG.

Ulrich Löchter, www.loechter-company.com

I usually keep distances as follows: 1.8m from key to fill and 1.7m from fill to kicker. Kicker is as close to the wall and angled as steep as possible toward the subject (when you use an umbrella, you have to watch that the flash light does not spill onto the wall, giving an umbrella-shaped shadow and uneven background lighting). So you can copy my setup right away, maybe varying f-stop and ISO due to use of flashes different than mine. Flash zoom is key=35mm to fill the whole umbrella and kicker=50mm to keep the flash from spilling. The key light umbrella will take care of lighting the background wall. A softbox wouldn´t do that, because it´d be much closer to the subject and produce more concentrated light. There would be a shadow gradient on the wall, darkest to the upper left. One more thing that´s nice about this setup: The physical presence of the fill light keeps the kicker light from hitting your lens, reducing contrast and producing flare and sad customers. Keep that in mind: In order to get a good, clean photograph you want to avoid hard light sources hitting your front lens!


I like to use the smaller silver umbrella for kicker light, because being a smaller source, it produces harder light than a white umbrella would. Plus, it is my smallest umbrella so I don´t have that much trouble pushing it closer to the right frame border and keeping it out of the shot. In fact, you can use a bare bulb flash as a kicker light, it wouldn´t matter much. Kicker lights always come in hard, because they make a direct reflection on the subject´s skin and clothing. I just like to soften it a little in most cases.


For the second shot, I had him stand up and put his jacket on, just to have a variation that looks less casual and relaxed, but more like a reputable executive:

Look, Ma! Same light, different position.

The setup didn´t change a bit, but he stepped back a little. You can see that the shadow fill lost a lot of power. This happens when you increase the distance between subject and light. The light power drops exponentially. Your fill is the weakest light in this setup, thus loses first when your subject changes position. I liked the look of it, giving him an even stronger touch of sincerity. Thus, we kept it this way.

Here you can see what each light does:

Sorry for my hideous arrow drawing skills.

Thursday, January 5, 2012

The ultimate Strobist flash: Metz 40MZ

Hello Strobists! Today I want to show you the flash head I consider the most appropriate for location work. It features manual control over 8 stops of flash power in 1/3rd steps and can be zoomed from 20 to 105mm (Ver.3 only) of flash spreading, which makes it uniquely versatile. It can read out today´s cameras´ TTL informations to work correctly in automatic mode and still features full manual control over its capabilities... the 


METZ 40MZ!

An interesting note first: Metz flashes are always adapted to the camera system via an interface called "SCA Adapter". The model of the adapter corresponds to the camera brand. There are sync-contact-only-SCAs that only feature the middle contact, but also a variety of Leica, Nikon, Canon and Minolta/Sony adapters. Some come with readout of TTL, some don't. For the 40MZ, there technically is no way of reading out today´s E-TTL II, but the flash DOES read out ISO, f-stop and lens data from a modern camera for use in automatic mode or calculation in manual mode when fitted with a SCA 3101 (Metz provides a list on which SCA adapter fits which camera model). ATTENTION STROBISTS: none of these SCA adapters has a PC terminal, they need to be triggered via the hot shoe contact!!


The 40MZ´s head can tilt up to 90 degrees in three steps. There is no arresting feature, so it cannot easily carry heavy light modifiers when tilted. The head might drop. It also tilts down some seven degrees and swivels 90° to the left (locking also at 45°) and 180° to the right (locking at 45 and 90°). There exists a slip-on diffusor, but I don´t know if it´s only produced off-brand. The lack of a tilt lock yet makes it much faster to swing around when changing camera orientation or light situation.

As mentioned before, the flash power can be reduced to 1/256th in 1/3rd stops, meaning 8 stops of dynamic range in total, 24 power settings (!) with almost instantaneous recycling times from 1/8th down. This makes it the ideal flash for off-camera strobist action. If I recall correctly, there are even 12 stops of range when used on-camera in automatic mode.

Every 40MZ has built-in autofocus support light (classic red on 40MZ-1).

The guide number is 40, BUT THIS IS FROM THE TIME BEFORE CHEATING! If you buy today´s "Speedlights" or "Speedlites", their great guide numbers of 55, 58 or even 60 are measured from the longest zoom position, where the flash power ist extremely concentrated. In early days, guide numbers were always stated at 50mm standard zoom setting. So it is with the 40MZ. At 105mm, the guide number is 50.

This machine can STROBE! You can adjust the number of flashes and the time in which they are to be fired. This gives you stroboscopic effects in a single picture.

This flash comes in three variations, 40MZ-1 to 40MZ-3. Versions 2 and 3 include an additional front-fixed flash (!!) in the foot. The light output is divided 85/15 between main and auxiliary head when activated (at the flick of a switch). Comes in handy when you want to illuminate the room by bouncing high over the ceiling or turn the main reflector into an umbrella with the aux head pointing at the subject. This support flash has slip-on ND plastic reducers hidden under the flash head! They reduce aux light power by 1 or 2 stops respectively.

Check it out... there are two ND plastic light reducers for the supplementary flash head. One is slipped on, the other is still in its place under the flash head (can be seen at the side that is slanted by 45° here). That´s analogue shit at its best!


There is a pull-out and slip-on wide-angle diffusor on some examples which enables light spreading for 20mm focal lengths. The 3 version can also zoom to 105mm instead of V1 and 2´s 85mm maximum.

There is a Ready-Sound (V2 and 3) that signalises acoustically that the flash is ready to go. It can be deactivated. There is also an alarm sound for automatic mode that rings when the flash didn´t get the right amount of light for the exposure.


Here you see the back, power turned off. The buttons are:
- display illumination
- f-stop adjustment (read out automatically for automatic mode with correct SCA adapter)
- remote switch (this flash can be triggered TTL-style with a special command module)
- "P" switch for power setting
- "ISO" adjustment  (read out automatically for automatic mode with correct SCA adapter)
- Ready tone adjustment (V2 and 3 only)
- "Prog" button for stored programs (you can store up to nine programs with every adjustable setting)
- zoom adjustment
- up right: "+" and "-" buttons for adjusting the preselected value
below:
- ready lamp and test firing button
- mode switch A-M-Strobe-TTL and sometimes "EASY MODE" (screw this one)
- o.k. lamp for check of correct exposure in automatic mode
- power switch with energy-save-setting and keylock setting (and both-at-once-setting!)
below: the SCA adapter
- first- or second curtain-setting ("slow flash")
- coarse and fine power setting (+-3 stops and +-1/3stops)
- ATTL on/off (Canon specific!) some feature ETTL/ATTLm but still can´t read E-TTL. The flash doesn´t understand it.
On the left side of the device you can see the switch for the additional flash (on/off).

The display is super comprehensive. It shows everything you need to know. And it´s huge!

Metz flashes come cheap via ebay! Most units have been cared for exceptionally well. They take 4 AA batteries, just like any other flash.

Metz flashes are German-built and really tough. I´ve dropped some of mine a couple times, once from a two-meter high support. I had to push some of the plastic back into the fittings, but it still lives and throws light at things.

The 40MZ doesn´t produce a round light spot. It´s more like a wide oval. But that´s common among zoom head flashes.

The 100-Euro-Calumet plastic light modifier set will fit.
The Rogue 3-in-1 Honeycomb Grid will fit (and work EXACTLY as promised! Nice!)

If you want to adapt this flash to some Bowens-Softbox-Speedring-Adapter or so, keep in mind that the 40MZ´s build is lower than the regular speedlight thing. You will need a thread adapter or two to raise it a little so it will fit through an adapter ring made for Canon or Nikon flashes. But then, it´s much more suitable for umbrella use. Tilting the head down by some degrees, it hits the exact middle of the umbrella.

SUMMARY: You get a hugely versatile flash head for real cheap. If the SCA adapter fits your camera and model, you get TTL-like features via automatic mode THAT ACTUALLY WORK while you still retain control over the power output. It is a dream to work with off- and on-camera. Since it was developed in a time between traditional flash work-only and super-modern TTL thingies-only, it marks the almost ideal design for both worlds (you do need to be a little quirky to show up with one of these). If you plan to get yourself one, don´t be shy to spend a hundred Euros/130 Dollars. It´s very rewarding to work with.

ADDENDUM: A NOTE ON WIRELESS FLASH
Don´t buy Chinese. You will lose your sync speed and have to go as slow as 1/160. You will not get a reliable unit that triggers every connected flash every time. Get at least a Hähnel Combi TF! It´s worth the extra money. The Hähnel doesn´t feature traditional PC connectors or -breakouts, but it will also work as a wireless remote camera trigger. It will trigger Nikon receivers from a Canon transmitter and vice versa, although only the hot shoe contact will work, still triggering any flash in the world.